Thursday, June 2, 2016

Does it spark joy?: Step 1 - Clothes

Three weeks ago I read The Life-Changing Magic of Tidying Up. I figured since I was in this home organization mood why not read a book to keep me motivated. Once I finished this book I realized that I've been going about this organizing thing all wrong. This book teaches you how to approach organizing and that's by decluttering your house first. So I immediately went to work. (And boy was it work). Marie Kondo is the author of this book and she says that it should be done in a precise order to help with the speed of the process.
  • Clothes
  • Books
  • Papers
  • Komono (All other miscellaneous categories)
  • Sentimental Items (Pictures and anything that brings memories)
Slowly I went to work. I started with my clothes. I gathered all my clothes in the entire house (off season stuff included) and picked every item up and made a decision. I asked myself does it spark joy? This is what Marie Kondo tells us we should ask about every item we hold onto. Once you do this it's easier to let go of things. If it doesn't bring you happiness or you don't use it, why hold onto it? So simple, yet I never applied it to my home....until now.


As you can see Josh and I cleared out bags of clothing. This is only the first day round.  I couldn't believe the amount of things I was holding onto for no good reason. Another aspect that helped the purging was finding the appropriate places to donate to. Knowing that my gently used items would go on to help someone else in need really helped with the letting go process. If you are looking for some local places to donate to here is where we donated to.

Catholic Community Services https://ccsutah.org/donate
YWCA Utah http://www.ywcautah.org/site/c.emJ1KgOQJhIaG/b.7965149/k.C221/Donate.htm
Deseret Industries https://www.deseretindustries.org/donate/donation-guidelines?lang=eng

Thursday, May 26, 2016

22 Minute Hard Corps

We just started our new workout program this week. It's called 22 Minute Hard Corps that has a boot camp feeling to it. It's a shorter workout, but is more challenging for us (in a good way). Since we liked the calendar checkoff so much that we used with the T25 program I decided to create another one tailored to this program. I am sharing it here in case anyone else is looking for something to help them stay accountable with 22 Minute Hard Corps.

To print the 22 Minute Hard Corps calendar click HERE
It looks like this:

Beachbody

Tuesday, May 24, 2016

T25 Workout Calendar

A few months ago I had shared with you  about our T25 workout we were doing. We started it just for fun to help us stick with our new year goals. A couple of weeks ago we actually completed the entire workout program including the bonus T25 Gamma Cycle. This was the longest any of us had ever committed to any type of workout. It was a total of 18 weeks to be exact that we completed. By the way the "we" and "us" I keep referring to is my husband and my mom.  As I had mentioned in my previous post we decided to utilize a check off calendar to keep ourselves accountable.

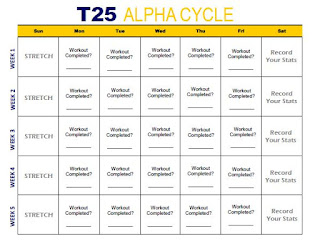
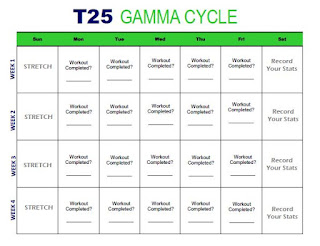
Here's how it worked. If you completed the workout you get a check mark. It would also help us if we needed to makeup a workout from during the week. We could easily see which day we missed and do the workout. No frills, nothing special, very simple yet helpful. Now I'm all for sharing things I find useful. Because I could find nothing else like this out there I actually made my own checkoff calendars for Alpha, Beta and Gamma. Below I have shared what they look like as well as the link to print it. This was just an added help to keep ourselves accountable that seemed to work. Maybe it will benefit someone else out there who is trying to stay committed to their fitness goals.


For the Alpha Calendar click HERE
This is what it looks like:
Workout Calendar ALPHA T25 Beachbody


For the Beta Calendar click HERE
 This is what it looks like:
Workout Calendar BETA T25 Beachbody


For the Gamma Calendar click HERE
 This is what it looks like:

Workout Calendar GAMMA T25 Beachbody

Monday, May 16, 2016

Home Organization: Under Kitchen Sink

Recently I found At Home With Nikki. If you are looking for organizational tips definitely look her up. She has inspired me to get my house in order. Confession: I've lived in my home for 5 years and for some reason I didn't fully make it my home. I never really gave everything a place and put things away like they should be. At Home With Nikki also has a YouTube channel that I discovered and it has given me so many ideas on how to organize different areas in my home. I started with small problem areas that I've been meaning to tackle. For example under the kitchen sink. It's always been a mess. It's been a catch all space for anything cleaning. I tried to make use of the space in the past by adding in a shelf a while back, but it didn't help much. But once I saw Nikki's video on her under the kitchen sink ideas I wanted to clean ours up too and make ours more functional.

Here's what the before and after looked like.

Under Kitchen Sink

Sunday, May 1, 2016

Godparents Gift

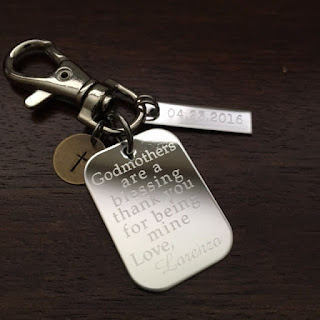
As you know we recently Baptized our little Lorenzo. Along with the planning of items needed for the actual day we had to decide what we would gift Lorenzo's Godparents. Believe it or not this was a tough task. We wanted it to be something unique, special and significant. There were a lot of ideas out there, but I settled on an Etsy store that made personalized key chains. You can find them here. I thought it was perfect! This was something that they could carry with them and would be a small reminder of the day that they became a Godparent. Below is a picture of what they each turned out like.

Godparents Gifts Catholic


Godparents Gift Catholic Keychain


Friday, April 22, 2016

Baptism Favors

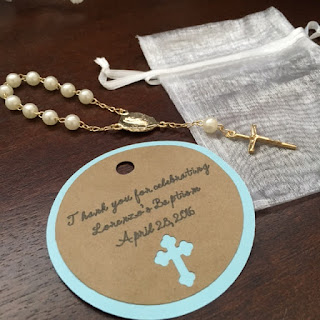
Our little one will be getting Baptized this weekend! We couldn't be more excited about the big day. A very important day for all of us. There will not be any huge reception party like many do. We don't want to take away from the importance of the actual Sacrament itself. We decided that we would Baptize him and then have just a small lunch with family. To thank those who took the time out of their day to come support us we wanted to have favors. Finding just the right favor was quite the task. I wanted something simple, but unique. I ended up deciding on giving a mini rosary in a keepsake bag with tag. The mini rosaries where just what I had hoped for. I ordered them off of Etsy from Faithpieces. If you were looking for anything like this for your religious event I would highly recommend them. Here is a peek at what I made.


Tuesday, April 19, 2016

Organizing Craft Space - Project 2: Pens & Markers Holder

As I mentioned before I have been slowly trying to find new solutions to my craft space. I have started dabbling in lettering a little bit and have accumulated a variety of markers. One pen holder is no longer enough. I needed something slightly larger. I found this neat idea to make a pen and marker holder with repurposed things you might have in your home. Since it wasn't going to cost me much I thought I'd give it a try. Here's what it turned out like.


I used paper towel rolls and an old box.

This is the finished product


If you want to make one of your own this is what you will need:
- Paper towel rolls or toilet paper rolls.
- An old box; shoe box, kleenex box or any box you were going to recycle anyway.
- Decorative paper to wrap the box in. I found mine in the dollar section at Michael's craft store.
- Craft glue and/or tape

Next cut off any excess flaps your box may have.
Then wrap the box with your wrapping paper of choice. I  used glue for the paper on the side and tape on the inside and underneath for extra security.
Place your paper towel rolls inside the box snugly so that they don't move around.
Add your pens/markers/supplies and your done! Enjoy your new holder.


Thursday, April 14, 2016

Organizing Craft Space - Project 1: Embellishments

Over this last year my craft space has grown immensely. With that comes the issue of keeping everything organized. My embellishments for paper crafting has grown over the years and it has just kind of piled up in a bag and then spilled into a drawer. I was getting to the point that I couldn't find the little things I need and it was becoming a headache.

My latest little project was to find a solution for all those little embellishments I have. I started by measuring the embellishments to see what size tote or box would work best for me. I found a small plastic clear tote at Michaels. I love that it has a handle for easily moving it out of my craft space to my working space. You can find the tote I used here. Next I made up some dividers that fit in the tote. Since the tote is a little on the small end I had to custom make it my self. Next I organized them all by categories I had. This has been a fun little task and I feel better already. Funny how having an organized space makes you feel. This is what it looked like finished.

Dividers Craft Organizing

Craft Organizing


Wednesday, April 13, 2016

Easy Zucchini Boats

I came across this recipe for Lasagna Zucchini Boats. It looked really yummy, but I didn't quite have all the ingredients to make the exact thing. So I made my own version instead. To my surprise it turned out good. Josh actually loved it, and he is the picky eater around here. I will definetly add this to my list of recipe's to make in the future. Here's all you need to make it.

Ingredients.
  • 4 Zucchini's (Good size so that they hold the meat, not the skinny ones)
  • 1 lb of lean ground beef
  • Prego Garlic Spaghetti Sauce
  • Shredded Mozzarella Cheese
  • Garlic salt to taste (you can just add salt and pepper too, but I happen to love garlic salt)
Preheat oven to 400 degrees.
I added foil and sprayed the pan with cooking oil so that it doesn't stick and easy clean up.
Cook the ground beef well until brown. Add garlic salt to taste.
Next stir in the spaghetti sauce in the same pan.
Rinse your zucchini, cut them in half, then scoop out the middle for your meat.
Fill in your zucchini with ground beef, top them with Mozzarella. (I have a picky cheese eater in the house so I left some of them with little cheese and others with more.)
Continue Cooking in the oven for 30 minutes covered until cheese is nice and melted and zucchini is soft.
ENJOY!!


Friday, February 19, 2016

Toys we love

Before I had a baby I never really gave a second thought as to what type of toys I'd be okay with my baby playing with.  I think my main focus was survival. Especially after the whirlwind of a start we had. But after all the scary stuff settled down I did some research, and I found that there were some children toys that I was not okay with.  I was never really a fan of all the noisy plastic toys (you know the ones).  Since I was going to be home with him I was perfectly fine with being the one to point out and say the colors, shapes and ABC's. I didn't need a toy doing that for me. I also found that even though wooden toys were a little more simple there was something more about them. You can find several articles that will tell you wooden toys actually encourage open ended play and creativity. Who wouldn't want that for their little one?

So Josh and I decided that this was the route we would continue. As we began purchasing toys we decided to go for the wooden toys instead of noisy ones. At first I wasn't sure if they were all that they were cracked up to be. Maybe this was just some expensive trend that would pass. But to our surprise we found that our baby actually enjoyed them.  I love to watch him explore and problem solve. It's fun to see how entertained he is them. Which is why I am so excited to share with you some of the toys that our little one likes.

Classic Wooden Beads - Manhattan Toy
Classic Grasping Activity
Rattle Activity Clutching Toy
Wobble Around Beads
Caterpillar Wood Stacker
Magic Ball Wooden Toy
Clutching Toy


Sunday, February 14, 2016

Sensory Play

I'm sure you have seen several ideas for Sensory Play. Sometimes I am hesitant to even try any because I either don't have all the items needed to do these fabulous Sensory bins. Or it looks like it takes far more steps than I am willing to do to make it. Although recently I came across this one idea that I actually had the items needed.

-Container of some sort to hold shells
-Shell Noodles (Preferably extra large, but small works too)
-Toy Links

The idea behind this is to just let your little one explore (with caution of course).  It was fun to watch Lorenzo try to figure out what these new things were. He was actually pretty good at finding and picking out all his colorful links. Who knew something so simple would be fun.

I think this activity is perfect for little ones who are around the age of 12 months. I watched Lorenzo like a hawk the whole time. I can't urge you enough to be careful with your little one. Especially if you are using small ones like I did. It can be a choking hazard, so don't leave your little one alone not even for a second. The site I found this on actually used extra large shells, but I just used what I had.  As a parent always use your best judgement. If you want to try this Sensory Bin with your little one you can find the link I referenced here. Have fun!!!

Sensory Play


Sensory Bin
Here's Lorenzo starting to sort the links out

Sunday, February 7, 2016

Sticking to our workout goals

Since the new year my mom and Josh and I teamed up together to start this T25 workout at home. Yes, we joined the rest of the world on the "Get Healthy" as a new year resolution. We actually followed the workout routine that came with these videos. I honestly thought that we would do it for a week or two then give up. But somehow it became a  part of our daily routine and we stuck with it.

We just completed the first 5 weeks which was the Alpha workout level. Some days we did it individually, other days together. It's been kind of nice to do this all together as a team because we have kept each other accountable. We check in with each other and my mom has put together a little check list. Yes, we took it old school too. HAHA! I don't usually share much about my workout routines, but I am so proud of us. I have honestly never worked out this much every day. Especially with my one year old. The nice thing about this work out is it's just enough time for me to work out and take a shower while my little one naps. (Mommy life is tricky that way.) I also don't feel like we're getting cheated in anyway with these workouts because even though they are short they are pretty tough and we work our butts off. You would be surprised how sweaty we get in 25 minutes. Anyway we are really excited about starting the next workout level which is Beta. Wish us luck!

Wednesday, February 3, 2016

Lorenzo is One!

Well, the day is finally here. My sweet Lorenzo has turned one. We had what I call a small family get together of 35ish at our house. (We are a Hispanic family, 35 is small.) It was just with people who I consider closest to Lorenzo. His party theme was Twinkle Twinkle Little Star. What better theme to choose than the song that we sang to him over and over the first year of his life?  This was not an easy theme that I could just go to a big box store for and pick up all the items that goes with it. There was a lot of detailed planning on my part that I hope would make the party memorable.

Here is a peek into the party.

Over this last year I took monthly pictures of Lorenzo on our rocking chair to show his growth over time. A simple task, that is worth showing off in the end. It was never my intention to overload my Facebook friends and family with these monthly pictures, but rather have them as memories for us and use it at his first birthday party in some way. So I had them printed off (4x5 size) and then made my own paper frame with the coordinating party colors. Then I hung them on some twine with mini clothes pins with stars to tie in the them. What I wasn't prepared for was our mom's reaction. Seeing their faces was the best part. They had no idea I had been doing this all along.

Birthday Banner


We also cleared off a small bookshelf and placed it in the entryway with some of my favorite and most memorable pictures over the year. I had this poster made which included all his favorite things and first word. We also used this as a photo prop. I thought it was wonderfully made and was a nice addition to the party. SimplyDovie created this for us. You can find her page here. The only thing I did was printed and framed it. I thought it was a sweet keepsake too.


 I made a high chair banner for him since I knew we would be giving him a small smash cake the day of the party. Plus it made a cute photo prop. This too was made with coordinating party colors.

1st Birthday High Chair Banner


I found an idea somewhere to do a Time Capsule. We had everyone who attended the party write a letter to Lorenzo that will be given to him on his 21st birthday. I chose 21 because I simply wanted him to be old enough to care. At 16 we all know that our minds are on high school, driving and whatever the next day holds for us. At 18 he might be preoccupied with graduation and college coming up. At 21 I felt that he would be mature enough to appreciate what words of wisdom this box would hold.

1st Birthday Time Capsule Idea


In the capsule I included the following:
-National newspapers the day of his birthday
-Top movies
-Top songs
-What the stock market closed at
-What a stamp costs
-What homes in our area cost
-The latest iPhone
-What are some world records of our time, etc.
-The letters his guests wrote to him
-A few birthday cards he received
-Pictures of who was there
-Some mementos from the party, like the high chair banner, party hat and his birthday candle.

For the display table I wrote out Twinkle Twinkle Little Star. Yes, I wrote that myself. To my Lettering enthusiasts out there it might not look that impressive. But it was rather difficult for me. (That's a topic for later) I also made my own tassel garland so that it could coordinate with the party colors. The the star garland which I hung from the ceiling was made by yours truly. I followed a tutorial on Pinterest for the tassel garland. It was very simple to do, but fair warning if you are going to attempt this, it is time consuming. I also hung gold star garland that I made from the ceiling.

1st Birthday Theme


Last, but not least our Thank You notes. We had SimplyDovie create our thank you notes too. We handed these Thank You's out along with party favors as our guest left. Since most of the guests were adults we gave monogrammed candle holders and coasters. Our few younger guests got something a little more age appropriate.

1st Birthday Thank You Note Idea