Tuesday, November 24, 2015

Ugly Sweater Banner

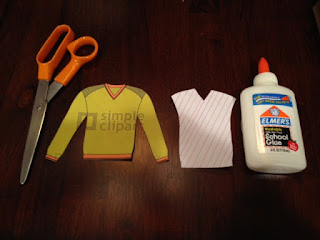
Josh and I decided that we would go ahead and host a Christmas Party for the cousins again. A couple of years ago we made it a Hot Cocoa theme. This year we thought we would try the Ugly Sweater theme. I thought it would be a lot of fun and started thinking of the fun stuff we could do. Of course any good party has fun details. It's what makes it more special. I came across this idea on Pinterest for a Ugly Sweater Banner. (http://blog.silhouetteamerica.com/2014/12/ugly-holiday-sweater-clothesline-banner) I thought the idea was brilliant and got started on my version right away. It was really very simple and thought I would share with you all how I made my version.

You will Need

- Sweater templates
- Card stock holiday paper
- Scissors
- Glue (Elmers Glue or Glue Stick)
- Mini clothes line clips
- Some kind of string to hang them on. (Twine, Ribbon, or Yarn)
- Any other details you want to add to the sweaters (pom pom's, glitter, stickers, etc.)


  • First find a template of a Sweater. I found mine on Microsoft Word. Cut out the perimeter of the sweater. 
  • Next trace the inner part of the sweater to make what looks like a vest. Then cut that out to use as a templete too. So now you should have two templates. 
  • Once that is done you can use various holiday card stock craft paper to make your sweaters. Simply trace your sweater templates and have get creative making them ugly. 


 I chose to add different embellishments like a snowflake, gingerbread men, snowmen, a star and candy canes and stockings. Hopefully these will inspire you if you are thinking of making an Ugly Sweater Banner of your own.


Saturday, November 21, 2015

Slouchy Beanie for Toddler

Last year I came across the cutest photo on Pinterest. It was a pattern for a slouchy beanie that I thought was so adorable. I loved the originality of this hat and immediately knew I wanted to make this one day. Of course my problem was that I don't have a little girl of my own. But I do have a little cousin who I thought this would be perfect for. Since I had a little extra time on my hands I got to work. I wanted to make this hat before Christmas so that she could wear it during the Christmas season if she wanted. Below is the image I found that inspired me. Isn't this little girl a doll? I was so excited to finish this project and wrap it up for an early Christmas gift. I just hope that it fits my little cousin good and it keeps her nice and warm this winter.

Photo found on Ravelry.com (http://www.ravelry.com/patterns/library/frieda-slouchy-crochet-hat)
I later was doing some more browsing and found this pattern that looked very close to the part done in red. This one is called the Divine Hat. This pattern was free and is actually for an adult. You can find it here. Because I was making mine for a toddler I had to modify the pattern slightly.

Hat
I followed Lines 1-7 just as the pattern says and continued to repeat line 7 all the rest of the way until I had a total of 18 rows all together. This allowed for the slouch.

Brim
For the length of the brim you want to start 3 lines away from your starting point. (Note: This "starting point" will now be the bottom of your hat. It will be at the neck of the person wearing it.) Here is a visual to help you understand what I did here.

Start on the left and go in front of the hat and you will end on the right. The part in between the Start and End will not have anything because it is the base of the hat worn by the neck.


For the stitches on the brim I did something a little different. I kind of just made this part up to give me the look I was going for. I'm sure there's some type of proper name for this stitch, but I couldn't find it.
I started off by doing a slip stitching along the edge of the hat just three lines away from my "starting point". When I came back around I started to do what would be a Half Double Crochet, but once you have 3 loops on your hook I just pulled the 3rd loop all the way through the other two loops on the hook instead of doing another yarn over again. I did this in ever single hole back and forth until I had a total of 5 rows.

Braids
I cut 30 pcs of yarn about 22 inches long. I put 15 on each side and looped them through a hole on the edge. Fix them so that they are about 15 inches on each side. Then braid them and tie them off with another piece of string. I trimmeded up the edges so that they are mostly even.

Pom Pom
There are several ways you can make a Pom Pom so I wont try to explain that. Just do whatever method you like beset and tie it onto your hat. Or you can leave it without it. Since my hat was for a toddler I thought she would like a Pom Pom.

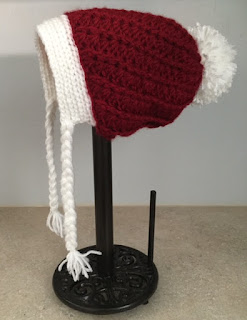
My finished hat looked like this. Not too far off from the original picture I was working towards.

Here's how it should look on. Sorry no creepy manikin heads in this house to display it on, so my paper towel holder will have to do. LoL!

Finishing touches. I added a "Handmade for you with Love by Blandina" tag


Saturday, November 14, 2015

Crochet Christmas Elf Hat

Some time during the summer I came across some ideas on Pinterest for baby elf hats. I thought they were adorable and would make a wonderful photo prop. You could buy these on Zulily or on Etsy, but why buy one when you can make one yourself for half the cost?

I did some research and found several patterns. There was one that I liked best, but it was only for a toddler to adult size. This is the link to the blog spot I used: http://two-little-cs.blogspot.com/2014/11/elf-hat-crochet-pattern.html. I followed most of the pattern, but I modified it slightly and stopped at 50 rounds so that it would fit Lorenzo's head. He's 9 months now, so that would give you an idea if you are thinking of making one for your little one.

I just finished it up this weekend and it turned out great. I did have to look up a YouTube video to help me with the "magic circle" part, but other than that it was so easy. Here is the link I used in case you need the visual too https://youtu.be/59fTgXD1vjg. I had so much fun making this and it really got me into the Christmas spirit already. I just wish I knew more little ones to make one for.

This is Lorenzo wearing his elf hat


Friday, November 6, 2015

Sophie's Back Home

Today I brought home our Sophie's remains. I can't help, but feel a sense of relief that she's back home with us. I don't know how to explain it, but there was this aching pain in my heart when I said goodbye and then they took our Sophie away. The thing that surprised us most about this whole experience is the amount of time that it takes to get your dogs remains back from the crematorium. It was exactly four weeks. I understand that these things take time, but in my opinion it prolonged the closure. So you can understand why we feel a little relieved. We're happy to have her back home.